# Microsoft Defender for Endpoint

## Introduction

Microsoft Defender for Endpoint (Defender) is a unified endpoint security platform for preventative protection, post-breach detection, automated investigation, and response. This was formerly known as Microsoft Defender ATP.

Integration with Defender adds host context to aid in host identification during a security investigation. When Vectra NDR (Detect) sees a host session come online, it polls Defender for host information. Host information may include the following:

* Machine ID
* Machine name
* Operating system
* Isolation status

Defender host context is available under the Host Details tab of individual Host pages.

{% hint style="info" %}
**Please Note:**

Vectra plans to release AI Stitching with Defender EDR in 1H 2026.

* Configuring Advanced Query permissions now as part of your Defender API client permissions will ensure the integration is future-ready without needing to revisit API client settings later.
* This capability automatically stitches EDR process data to Vectra detections, exposing root cause instantly.
* Please refer to the configuration steps below for adding the appropriate permissions.
* If you have previously configured Defender integration:
  * Existing API clients can simply be edited in your Azure Portal to add the Advanced Query permissions to your existing client.
  * No changes will be required in your Vectra deployment
    {% endhint %}

## Requirements

### Checking for Required Defender License

This integration requires that customers are subscribed to **MS Defender for Endpoint Plan** 2.

* More information about the license options is available from Microsoft here: [Compare Microsoft Endpoint Security Plans](https://docs.microsoft.com/en-us/microsoft-365/security/defender-endpoint/defender-endpoint-plan-1-2?view=o365-worldwide)
* To check for the type of Defender license, please see the **Review License Usage** section here: [Change your endpoint security subscription](https://learn.microsoft.com/en-us/defender-business/mdb-manage-subscription#review-license-usage)

{% hint style="warning" %}
**Please Note:**

Microsoft **DOES NOT** support a mixed licensing types.

* This Microsoft article provides more details in the [Can I have a mix of Microsoft endpoint security subscriptions?](https://learn.microsoft.com/en-us/defender-business/mdb-faq#can-i-have-a-mix-of-microsoft-endpoint-security-subscriptions) section.
  {% endhint %}

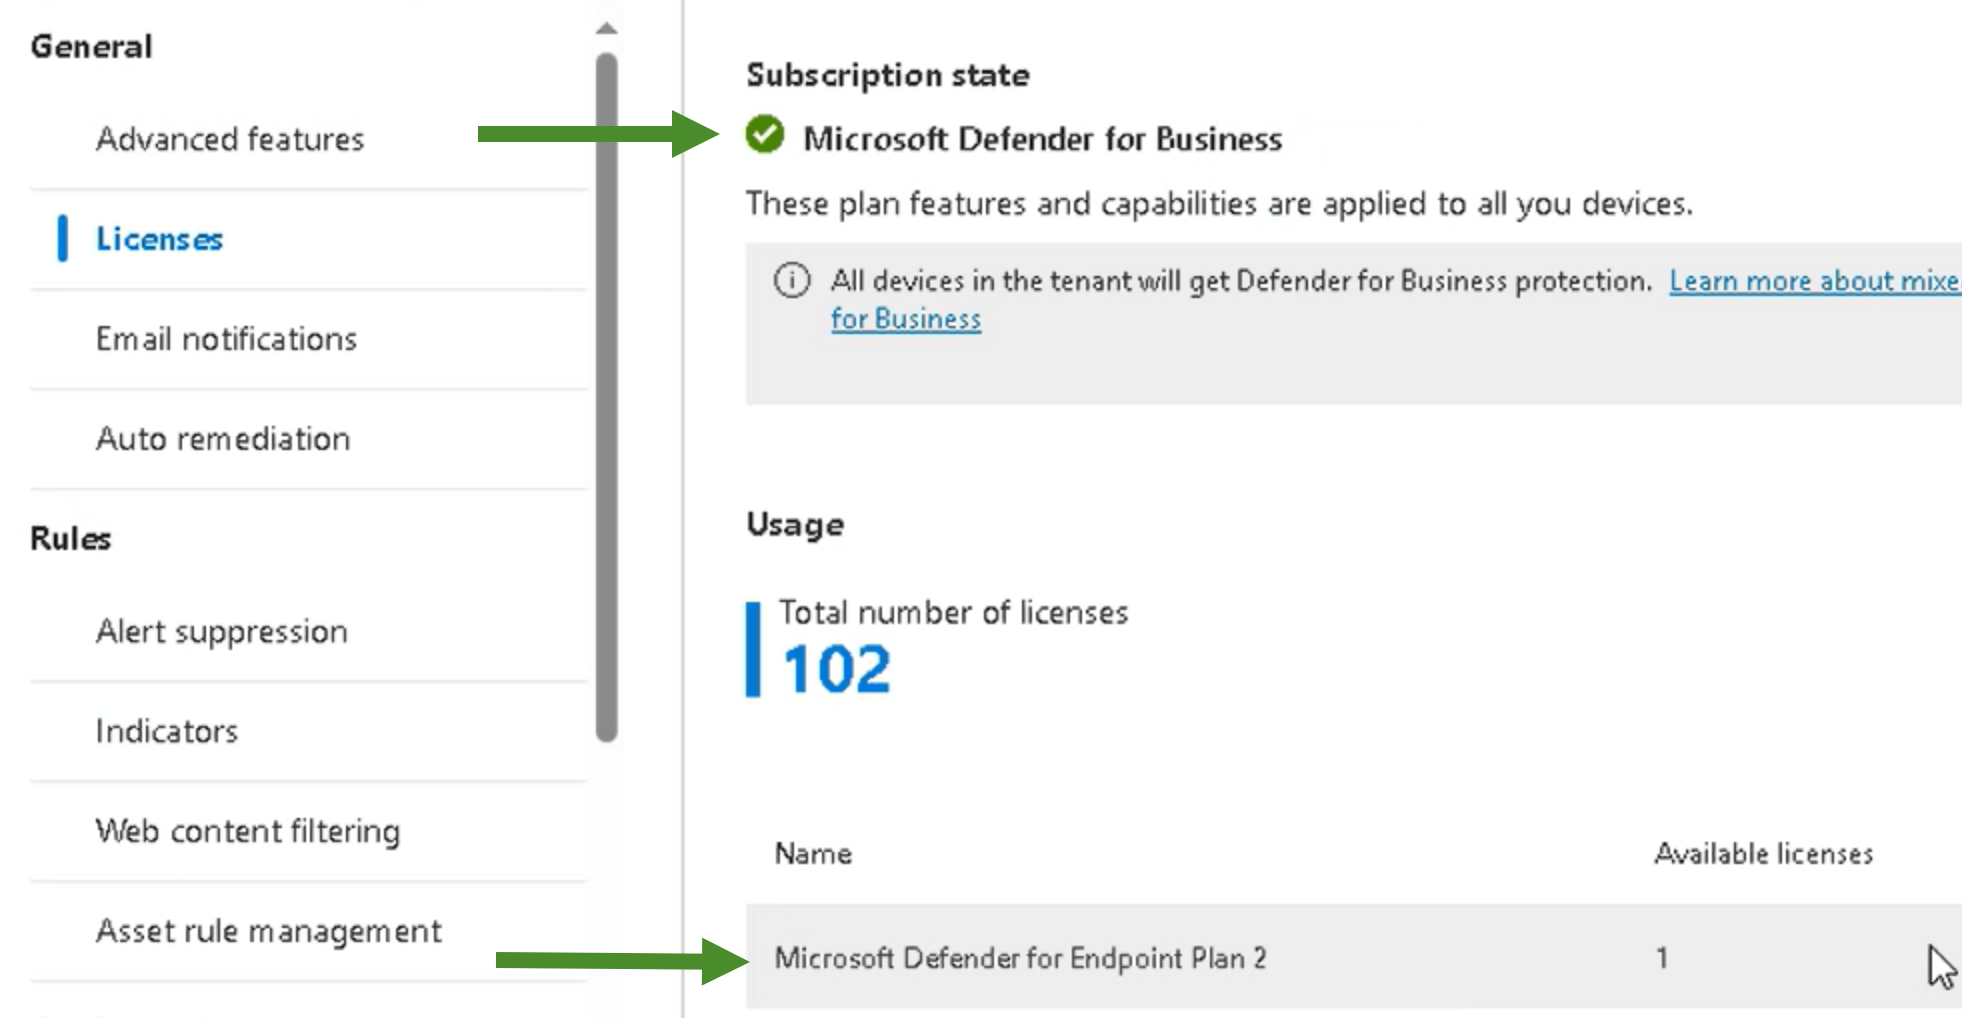
For example, in the screenshot below, both **Microsoft Defender for Business** and **Microsoft Defender for Endpoint Plan 2** licenses appear in the Licenses screen. In this scenario, the tenant defaults to the Defender for Business experience. As a result, the Vectra integration is not supported, since it requires **Microsoft Defender for Endpoint Plan 2**. Microsoft confirms this behavior in its documentation on [mixed licensing](https://learn.microsoft.com/en-us/defender-business/mdb-faq#can-i-have-a-mix-of-microsoft-endpoint-security-subscriptions):

> Microsoft Defender for Business does not support mixed licensing, so a tenant with Defender for Business (which is included in Microsoft 365 Business Premium) along with Defender for Endpoint Plan 2 (which is included in Microsoft 365 E5 Security) defaults to the Defender for Business experience.

<figure><img src="/files/4n8a8vtMacABwMDJ21m1" alt=""><figcaption></figcaption></figure>

* Please ensure that your Defender console shows licensing as per the below screenshot and NOT as per the above screenshot. This license status is available from *System → Settings → Endpoint → Licenses.*
* Please note that the Subscription State shows **Microsoft Defender for Endpoint Plan 2** which is the requirement for the Vectra integration.

![](/files/UQGciKOOE8owq8O5XhLb)

### Vectra License

Please also make sure that you do have a valid **Vectra NDR (Detect)** license.

### Connectivity Requirements

All communication occurs between your Vectra Brain appliance and the following Microsoft URLs:

<table><thead><tr><th width="175.765625">Endpoint Type</th><th width="273.26953125">Sign In</th><th width="347.63671875">Defender API</th></tr></thead><tbody><tr><td>Default/Commercial</td><td>https://login.microsoftonline.com</td><td>https://api.security.microsoft.com<br>https://api.securitycenter.microsoft.com</td></tr><tr><td>GCC</td><td>https://login.microsoftonline.com</td><td>https://api-gcc.securitycenter.microsoft.us</td></tr><tr><td>GCC High &#x26; DoD</td><td>https://login.microsoftonline.us</td><td>https://api-gov.securitycenter.microsoft.us</td></tr></tbody></table>

If you are experiencing connectivity issues, it may be necessary to configure your firewall rules to allow your Brain to communicate the above URLS depending on which endpoint you selected.

## Configuration

### Enabling the Defender integration in Vectra NDR (Detect)?

{% hint style="info" %}
**Please Note:**

The **Microsoft Defender for Endpoint URL** shown below is in the process of being added to the product. Vectra plans to make it available in the v9.12 release. If you need to be able to specify a GCC or Custom URL, please contact Vectra. It is possible to enable this functionality early for customers who wish to test it before general availability. A feature flag needs to be enabled for the new options to become visible.

Until all systems have the new functionality, only default Defender endpoint URLs are supported.
{% endhint %}

In your Vectra UI, navigate to *Configuration > SETUP > EDR Integrations > Microsoft Defender for Endpoint*.

* Select **Edit** on the far right-hand side.
* Toggle **Enable Microsoft Defender for Endpoint integration** to **On**.
* Next you will need to choose your **Microsoft Defender for Endpoint URL**. Vectra supports the following endpoints:
  * Default for commercial customers
  * GCC
  * GCC High / DOC
  * Custom

<figure><img src="/files/JQxgvDzZ4laLKjXsCpFM" alt=""><figcaption></figcaption></figure>

* If you have a **Custom URL** for your **Microsoft Defender for Endpoint URL**, enter it.
* Enter your Defender **Tenant ID**, **Application ID**, and **Application Secret** (this is the value of the client secret and not the SecretID).

{% hint style="info" %}
If you do not have your Tenant ID, Application ID or Application Secret, please see next section for details on where to locate them.
{% endhint %}

<figure><img src="/files/TfuUNlsJQaNLtv5rVodZ" alt=""><figcaption></figcaption></figure>

* Click **Save.**
* Once the credentials have been validated, the UI will provide confirmation that your configuration has been saved.
* Your Microsoft Defender for Endpoint integration setup is now complete.

### Finding Defender Tenant ID, Application ID, and Application Secret?

To get credentials for Defender for use with Vectra:

* Log into **portal.azure.com**.
* Select the **Entra ID** (formerly Azure Active Directory) service.
* Navigate to **Manage** > **App registrations** > **New registration**.
* In the registration form, choose a name for your application, and then select **Register**. Now you have a new application that you must assign the correct permissions to.
* Once your new application has been created, select **Manage > API permissions.**
* From the API permissions screen, select **Add a permission.**
* Select **APIs my organization uses**, and search for **WindowsDefenderATP.**
* Select **Application permissions.**
* Select the `AdvancedQuery.Read.All`, `Machine.Read.All` and `Machine.Isolate` permissions.
* Click **Add permissions**.
* After you add the permissions, select **Grant admin consent for \[*****your organization]*****.**
  * **For existing configurations, these are the new permissions required for EDR Process Stitching:**
    * Next, select **Add a permission.**
    * Select **APIs my organization uses**, and search for **Microsoft Threat Protection**
    * Select **Application permissions.**
    * Select the `AdvancedHunting.Read.All` permissions.
    * Click **Add permissions**.
    * After you add the permissions, select **Grant admin consent for \[*****your organization]*****.**
* Now your application now has all the permissions it needs. Next you will create a client secret.
* From the **Manage** menu of your application, select **Certificates & secrets**.
* Under the **Client secrets** section, click the **New client secret** button.
* Provide a brief description and an expiration timeframe and click **Add**.
* Make sure that you record this secret! This will be the **Application Secret** you enter into for your Defender integration configuration in the Vectra UI.

{% hint style="warning" %}
Please note that you **will** **not** be able to see this **Application Secret** again after you leave this page.
{% endhint %}

* Navigate to the **Overview** page from the left-hand menu of your application.
* From the Overview page, record your **Application (client) ID** and **Directory (tenant) ID**.
* You may now return to the Detect UI and enter the **Tenant ID**, **Application ID** and **Application Secret** you recorded above to complete the Microsoft Defender for Endpoint configuration in your Vectra UI.

## Finding Defender Hosts in Vectra

#### Respond UX (RUX) Deployments

Using the **Hunt** page with a filter for either of the below will find hosts running Defender:

* **Host Artifact Type** is **Microsoft Defender Name**
* **Host Artifact Type** is **Microsoft Defender ID**

#### Quadrant UX (QUX) Deployments

Using **Advanced Search** with the following query on the Hosts index will pull a list of hosts with Microsoft Defender artifacts:

```
host.host_artifact_set.type:windows_defender
```

## Host Lockdown Information

Vectra NDR (Detect) supports [Host Lockdown](/configuration/response/lockdown/host-lockdown-edr.md) using Microsoft Defender for Endpoint.

There are 2 sets of permissions associated with Host Lockdown for Microsoft Defender for Endpoint:

Configuration of Host Lockdown:

* **View**
  * `Configuration - Microsoft Defender` - controls who can view the Microsoft Defender for Endpoint External Connector settings, which includes the Host Lockdown settings.
* **Edit**
  * `Configuration - Microsoft Defender` - controls who can edit the Microsoft Defender for Endpoint External Connector settings, which includes the Host Lockdown settings.

Use of Host Lockdown:

* **Edit**
  * `Host Lockdown` - This allows users to manually lock or unlock individual hosts.

By default (assuming roles have not been modified), all of the above are automatically granted to the roles of Super Admin and Admin.


---

# Agent Instructions: Querying This Documentation

If you need additional information that is not directly available in this page, you can query the documentation dynamically by asking a question.

Perform an HTTP GET request on the current page URL with the `ask` query parameter:

```
GET https://docs.vectra.ai/configuration/setup/edr-integrations/microsoft-defender-for-endpoint.md?ask=<question>
```

The question should be specific, self-contained, and written in natural language.
The response will contain a direct answer to the question and relevant excerpts and sources from the documentation.

Use this mechanism when the answer is not explicitly present in the current page, you need clarification or additional context, or you want to retrieve related documentation sections.
